

文中项目文档的网址:https://github.com/Eterance/Pymaidol-Docs
2023.09.16更新:更好用的文档生成器:玩转云服务(6):使用 Docusaurus 创建项目文档
Windows 本地安装 Hugo
https://gohugo.io/installation/windows/
首先按照顺序安装前置需求: Git, Go, Chocolatey, saas。
然后使用 Chocolatey 安装 Hugo:
choco install hugo-extended然后下载安装 node.js(docsy 主题需要):https://nodejs.org/en/download
建立文档项目
CMD建立空的 Hugo 站点并安装 docsy 依赖:(pymaidol-docs 修改成自己的项目名称)
hugo new site pymaidol-docs
cd pymaidol-docs
git init

npm install --save-dev autoprefixer
npm install --save-dev postcss-cli
npm install -D postcss
然后自行添加一个 .gitignore 文件。内容是:(来自 https://github.com/google/docsy/blob/main/.gitignore)
/public
resources/
node_modules/
# package-lock.json 要一起上传,不然 CI 会出错
# https://github.com/actions/setup-node/blob/main/docs/advanced-usage.md#caching-packages-data
#package-lock.json
.hugo_build.lock
然后推送到 Github 上。
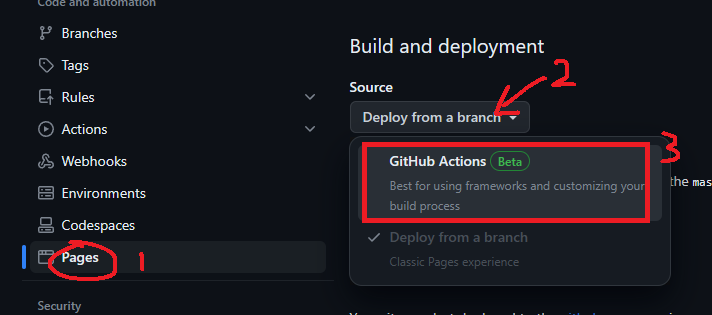
项目 Github Pages 设置

完善网站内容 & 本地运行测试网站
省略,自行借鉴我的文档项目。
hugo 运行的命令:
hugo serverGithub Action + Github Pages 线上部署
在根目录下新建文件夹及文件:.github/workflows/hugo-docsy-gh-pages.yml,并输入以下内容:
name: Deploy Hugo site with Docsy to Pages
# https://github.com/peaceiris/actions-hugo#%EF%B8%8F-workflow-for-autoprefixer-and-postcss-cli
# blend some part of official hugo deploy action:
# https://gohugo.io/hosting-and-deployment/hosting-on-github/#build-hugo-with-github-action
on:
push:
branches:
- main # Set a branch to deploy
# 官方部分
# Allows you to run this workflow manually from the Actions tab
workflow_dispatch:
# 不需要提交一次PR就触发CI
#pull_request:
# 官方部分
# Sets permissions of the GITHUB_TOKEN to allow deployment to GitHub Pages
permissions:
contents: read
pages: write
id-token: write
jobs:
build:
runs-on: ubuntu-22.04
concurrency:
group: ${{ github.workflow }}-${{ github.ref }}
steps:
- uses: actions/checkout@v3
with:
fetch-depth: 0 # Fetch all history for .GitInfo and .Lastmod
# 官方部分
- name: Setup Pages
id: pages
uses: actions/configure-pages@v3
- name: Setup Hugo
uses: peaceiris/actions-hugo@v2
with:
hugo-version: '0.110.0'
extended: true
- name: Setup Node
uses: actions/setup-node@v3
with:
node-version: '18'
cache: 'npm'
# The action defaults to search for the dependency file (package-lock.json,
# npm-shrinkwrap.json or yarn.lock) in the repository root, and uses its
# hash as a part of the cache key.
# https://github.com/actions/setup-node/blob/main/docs/advanced-usage.md#caching-packages-data
cache-dependency-path: '**/package-lock.json'
- run: npm ci
# 官方部分
- name: Build with Hugo
env:
# For maximum backward compatibility with Hugo modules
HUGO_ENVIRONMENT: production
HUGO_ENV: production
run: |
hugo \
--gc \
--minify \
--baseURL "${{ steps.pages.outputs.base_url }}/"
- name: Upload artifact
uses: actions/upload-pages-artifact@v1
with:
path: ./public
# 官方部分
# Deployment job
deploy:
environment:
name: github-pages
url: ${{ steps.deployment.outputs.page_url }}
runs-on: ubuntu-latest
needs: build
steps:
- name: Deploy to GitHub Pages
id: deployment
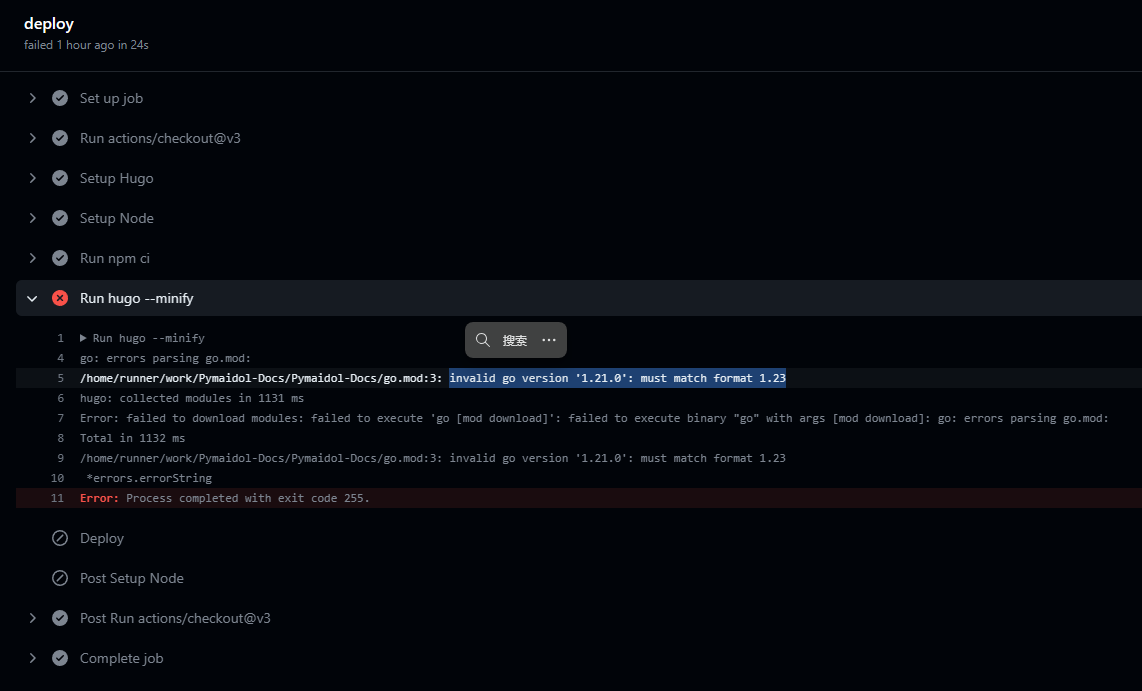
uses: actions/deploy-pages@v2根目录下的 go.mod 文件修改为:
module github.com/Eterance/pymaidol-docs

go 1.21

require github.com/google/docsy v0.7.1 // indirect
原本是 go 1.21.0,但是会导致 Github Actions 报错:
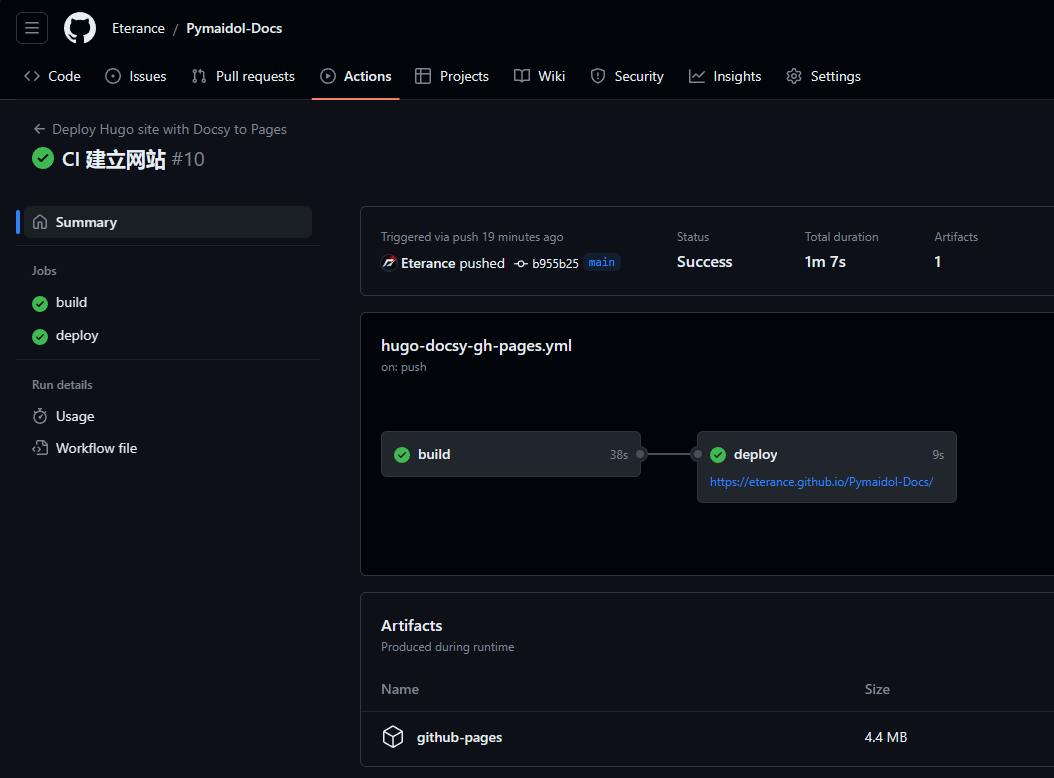
然后推送,就会触发CI(没触发就到项目 Action 手动点一下)。
Comments NOTHING